How to Use JB Weld Steel Stick: Step-by-Step Repair Guide
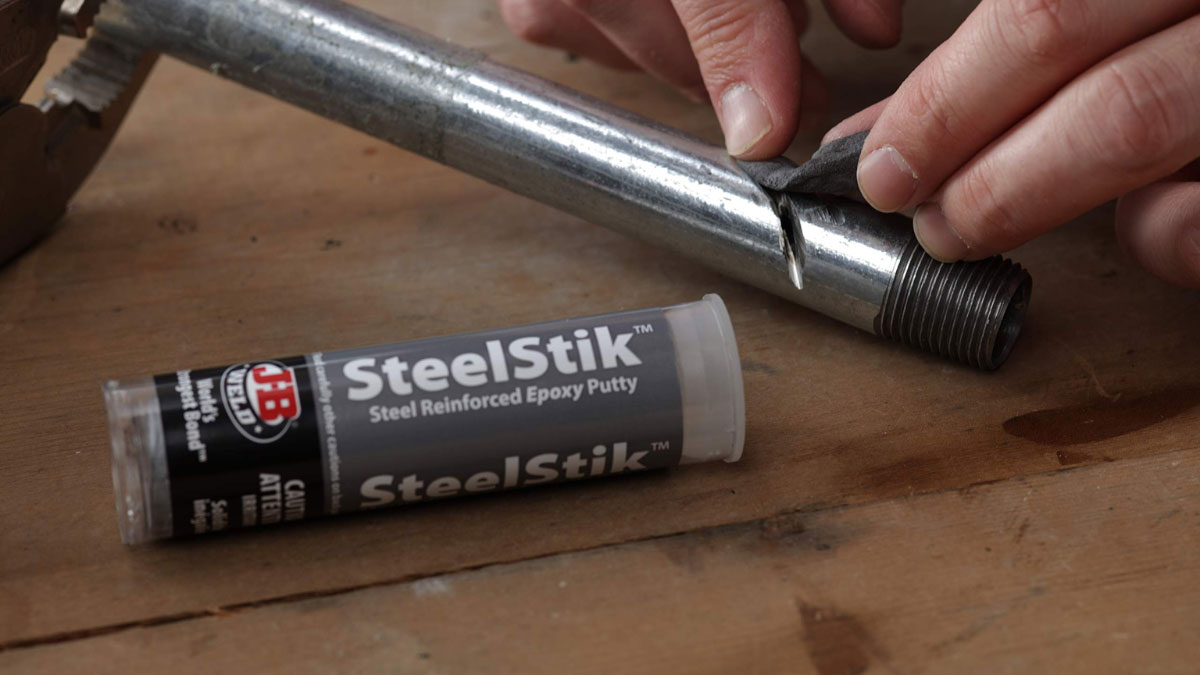
Got a broken metal part and wondering how to fix it without welding? JB Weld Steel Stick might be your perfect solution. This versatile epoxy putty is designed to repair and rebuild anything from pipes to automotive parts, offering a durable and permanent fix.
Key Takeaways
- Versatile Epoxy Putty: JB Weld Steel Stick is ideal for various repairs, including automotive, plumbing, and household fixes, making it a go-to for DIY enthusiasts and professionals.
- Durable and Permanent Fix: Sets in 5 minutes and cures fully in 60 minutes, providing a strong, long-lasting bond resistant to extreme conditions.
- Easy Application Process: Requires minimal tools and materials like a utility knife, sandpaper, gloves, and a clean surface for mixing and applying the putty.
- Proper Surface Preparation: Ensuring the surface is clean, dry, and grease-free is crucial for maximizing adhesion and repair effectiveness.
- Optimal Curing Conditions: Achieving the best results depends on maintaining temperatures between 50-100°F and low to moderate humidity, alongside applying consistent pressure during the initial set.
What Is J-B Weld Steel Stick
J-B Weld Steel Stick is an epoxy putty designed to provide durable and permanent repairs for metal surfaces. Recognized for its versatility, it’s used in various applications, including household repairs, automotive fixes, and plumbing.
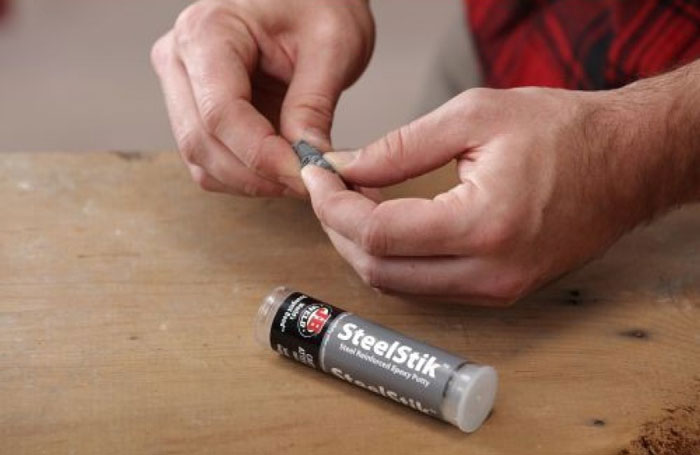
Key Features of J-B Weld Steel Stick
- Epoxy Putty: A moldable substance that hardens to form a reliable bond.
- Easy Application: Can be shaped by hand and applied directly to the repair area.
- Quick Setting: Begins to set in 5 minutes and cures in 60 minutes.
- Durability: Provides a strong, long-lasting fix resistant to extreme conditions.
Common Uses
- Automotive Repairs: Ideal for patching up radiators, fuel tanks, and exhaust systems.
- Plumbing: Effective for sealing leaks in pipes, faucets, and water tanks.
- Household Fixes: Suitable for mending broken tools, appliances, and fixtures.
Application Process
- Surface Preparation: Clean and dry the repair area.
- Mixing: Cut the required amount of Steel Stick and knead it until the color is uniform.
- Application: Press the putty firmly onto the repair surface, ensuring good adhesion.
- Shaping: Shape as needed within the first 3-5 minutes.
- Curing: Allow the putty to set for 60 minutes.
| Property | Value |
|---|---|
| Working Time | 3-5 minutes |
| Curing Time | 60 minutes |
| Max Temperature | 300°F (150°C) |
| Tensile Strength | 900 psi |
J-B Weld Steel Stick offers a practical and efficient solution for a variety of repair needs. The ease of application, combined with its robust properties, makes it a go-to product for both professionals and DIY enthusiasts.
Tools And Materials Needed
To effectively use JB Weld Steel Stick for your repair projects, you need specific tools and materials. These tools ensure a smooth application process and a strong bond. Here’s what you need:
Tools:
- Utility Knife: To cut the Steel Stick to the desired length.
- Sandpaper or Wire Brush: For surface preparation. Use 80-grit sandpaper for best results.
- Gloves: To protect your hands from the epoxy.
- Mixing Surface: A clean, disposable surface to mix the epoxy putty.
Materials:
- JB Weld Steel Stick: The primary epoxy putty for metal repair.
- Alcohol or Acetone: To clean the surface before application.
Key Items Detailed:
- Utility Knife: A sharp blade ensures precise cuts, making the handling and application easier.
- Sandpaper or Wire Brush: Roughening the surface guarantees better adhesion. Opt for an 80-grit sandpaper to achieve an ideal texture.
- Gloves: Non-reactive gloves, like nitrile, protect from skin irritation and ensure safety.
- Mixing Surface: Disposable surfaces such as wax paper or plastic sheets keep your work area clean and help easy disposal.
Preparation Table
Here’s a quick reference table to summarize the above tools and materials:
| Tool/Material | Purpose |
|---|---|
| Utility Knife | Cutting the putty to the correct size |
| Sandpaper/Wire Brush | Prepping the surface for maximum adhesion |
| Gloves | Protecting your hands during the process |
| Mixing Surface | Clean and disposable area to mix the putty |
| JB Weld Steel Stick | Primary epoxy putty for repairs |
| Alcohol/Acetone | Cleaning to remove grease, oil, and debris |
Having these tools and materials ready before starting your repair work with JB Weld Steel Stick ensures a smooth and efficient process. Always inspect your items to confirm they are in good condition. Proper preparation saves time and improves the bond’s durability.
Preparation Steps
Before using JB Weld Steel Stick, ensure proper preparation for optimal results. Below are the main steps to prepare the surface and the putty.
Clean The Surface
Proper surface cleaning is crucial for a strong bond. Follow these steps to clean the surface:
- Remove Debris: Use a wire brush or sandpaper to eliminate rust, paint, or any loose particles.
- Degrease: Apply alcohol or acetone with a clean cloth to remove oils and grease.
- Dry Thoroughly: Ensure the surface is completely dry before applying the putty.
Cut The Stick
Cutting the JB Weld Steel Stick correctly impacts the effectiveness of the repair. Here’s how to do it:
- Measure Required Amount: Determine how much putty you need for the repair.
- Use a Utility Knife: Cut the required portion from the stick.
- Inspect the Core: Ensure the two different colored cores are visible—thorough mixing of both parts is necessary for activation.
Definition List:
- Wire Brush: A tool with bristles used to remove dirt and rust.
- Acetone: A solvent used to clean surfaces of oils and residues.
- Utility Knife: A sharp tool for cutting materials like the Steel Stick.
Clean and cut preparation steps guarantee effective use of JB Weld Steel Stick for durable repairs.
Mixing The Compound
Mixing JB Weld Steel Stick is crucial for achieving a strong and durable bond. This section guides you through the essential steps to ensure proper mixing of the compound for optimal results.
Knead The Putty
Kneading the putty activates the chemical reaction needed for bonding. Follow these steps:
- Cut the Putty: Use a utility knife to cut the required amount. Ensure both colored cores are visible.
- Wear Gloves: Protect your hands by wearing gloves to avoid skin irritation.
- Blend Thoroughly: Press and knead the putty between your fingers until the colors blend into a uniform shade. This usually takes about 2-3 minutes.
- Check Consistency: The putty should feel smooth and pliable, ensuring it’s adequately mixed.
Achieve Uniform Color
Achieving a uniform color in the mixture indicates proper blending and readiness for application. Here’s how:
- No Streaks: Ensure there are no streaks or separate colors visible in the putty.
- Consistent Shade: The entire piece of putty should be a single solid color, typically gray.
- Test Stickiness: The putty should feel slightly tacky but not overly sticky, confirming it’s mixed well.
Avoid using the putty if it’s not uniformly colored, as improper mixing can weaken the bond. Properly mixed putty sets within 5 minutes and cures in 60 minutes, providing a reliable repair.
Application Process
Applying JB Weld Steel Stick involves a series of precise steps to ensure optimal results. This section walks you through the application process, focusing on the crucial phases of applying and molding the putty.
Apply To Surface
You can begin applying JB Weld Steel Stick to the prepared surface once it’s properly mixed. Follow these steps for a successful application:
- Cutting: Use a utility knife to cut the required amount of putty. Ensure both colored cores are visible.
- Gloves: Wear gloves to protect your hands from direct contact with the epoxy.
- Surface Cleaning: Confirm the surface is clean and dry. Use alcohol or acetone for degreasing.
- Putty Application: Press the putty onto the surface, ensuring it makes good contact. Apply pressure to push the compound into cracks or gaps.
Shape And Mold
After application, you can shape and mold the putty to fit the repair requirements. Here’s how:
- Initial Shaping: While the putty is still pliable, shape it using your hands or tools.
- Tool Use: Use a damp tool or sandpaper for finer shaping, avoiding water exposure for at least an hour.
- Final Adjustments: Make final adjustments before it starts setting, usually within 5 minutes.
- Set Time: Let the putty set, keeping the repair area undisturbed. Full curing occurs after 60 minutes.
Following these steps ensures a strong, durable bond, making JB Weld Steel Stick highly effective for repairs. Keep these procedures in mind for optimal results.
Curing Time And Tips
Proper curing time and adherence to specific tips are essential for the successful use of JB Weld Steel Stick. Understanding these aspects ensures a durable and effective repair.
Optimal Curing Conditions
Achieving optimal results with JB Weld Steel Stick relies on maintaining the right conditions during curing.
- Temperature: Ensure a temperature range of 50-100°F (10-38°C) during curing. Extreme temperatures can affect the bond strength.
- Humidity: Keep humidity levels low to moderate. High humidity can delay curing.
- Pressure: Apply consistent pressure to the putty during the initial set time for a strong bond.
- Setting Time: Allow the putty to set for 5 minutes before handling it. This initial set is crucial for proper binding.
- Curing Time: Let the putty cure for at least 60 minutes. Maximum strength develops after 24 hours.
Additional Tips For Best Results
Following additional tips can enhance the effectiveness and longevity of your repairs.
- Surface Preparation: Clean and dry surfaces ensure better adhesion. Alcohol or acetone works well for this purpose.
- Proper Mixing: Blend the putty until it reaches a uniform color. Streaks indicate incomplete mixing, which can compromise strength.
- Glove Use: Wear gloves to protect your hands and avoid contamination of the putty.
- Tool Assistance: Use tools like spatulas or sculpting tools for precise application and shaping.
- Initial Pressure: Once applied, press the putty firmly into any cracks or gaps to ensure full contact and adhesion.
- Avoid Movement: While curing, ensure the repaired item remains stationary to prevent shifting and weak bonds.
| Condition/Tip | Description |
|---|---|
| Temperature | Maintain 50-100°F (10-38°C) for optimal curing. |
| Humidity | Low to moderate levels recommended. |
| Pressure | Apply constant pressure during the initial 5 minutes. |
| Setting Time | Allow 5 minutes for initial set before handling. |
| Curing Time | Cure for at least 60 minutes; full strength in 24 hours. |
| Surface Preparation | Clean, dry with alcohol or acetone. |
| Mixing | Uniform color, no streaks. |
| Glove Use | Protect hands, avoid putty contamination. |
| Tool Assistance | Use spatulas, sculpting tools for application. |
| Initial Pressure | Press firmly into cracks or gaps. |
| Avoid Movement | Keep item stationary during curing. |
Maintaining optimal curing conditions and following these tips ensures the best performance from your JB Weld Steel Stick repairs.
Conclusion
Mastering the use of JB Weld Steel Stick can transform your repair projects, offering a reliable and durable solution for a variety of metal repairs. By following the outlined steps for surface preparation, proper mixing, and precise application, you ensure the strongest bond possible. Remember to maintain the ideal curing conditions and allow adequate time for the putty to set and cure fully. With these practices, JB Weld Steel Stick becomes an invaluable tool in your repair arsenal, delivering professional results whether you’re tackling household fixes, automotive repairs, or plumbing issues.
Frequently Asked Questions
What is JB Weld Steel Stick used for?
JB Weld Steel Stick is a versatile epoxy putty used for repairing and rebuilding metal parts. Common applications include automotive repairs, plumbing leak sealing, and household fixes, providing a durable and permanent solution without the need for welding.
How long does JB Weld Steel Stick take to cure?
JB Weld Steel Stick sets in approximately 5 minutes and cures in 60 minutes. However, for maximum strength, it is recommended to let it cure for 24 hours.
Can JB Weld Steel Stick be used on wet surfaces?
JB Weld Steel Stick can be used on wet surfaces, but for optimal results, it is best applied to clean, dry surfaces. Ensure the area is free of debris, grease, and moisture before application.
What materials do I need to use JB Weld Steel Stick?
Essential tools and materials include JB Weld Steel Stick, a utility knife, sandpaper or wire brush for surface preparation, gloves for protection, and alcohol or acetone for cleaning surfaces before application.
How do you properly mix JB Weld Steel Stick?
Cut the required amount of putty, then knead it with your fingers until the color is uniform and streak-free. Proper mixing is crucial for effective bonding.
Is JB Weld Steel Stick durable?
Yes, JB Weld Steel Stick offers a strong and durable bond rated at 4000 PSI. Once cured, it can withstand water pressure up to 500 PSI and temperatures up to 350°F.
Can JB Weld Steel Stick be molded and shaped?
Yes, JB Weld Steel Stick is moldable and can be shaped during the initial application phase. Use tools for finer adjustments while the putty is still pliable.
How do you prepare the surface for JB Weld Steel Stick?
Clean the surface thoroughly by removing debris and degreasing with alcohol or acetone. Ensure the surface is completely dry before applying the putty for optimal adhesion.
What conditions are ideal for curing JB Weld Steel Stick?
The ideal conditions for curing JB Weld Steel Stick include a temperature range of 50-100°F (10-38°C), low to moderate humidity, and applying consistent pressure during the initial set time. Avoid handling the area for at least 5 minutes post-application.
What are some safety tips when using JB Weld Steel Stick?
Always wear gloves to protect your hands during application and mixing. Work in a well-ventilated area, and avoid direct contact with skin and eyes. Follow the manufacturer’s safety guidelines for best results.

