Glue for Vinyl Flooring: Ultimate Guide to Adhesive Selection
Choosing the right glue for your vinyl flooring can make all the difference in ensuring a long-lasting, durable finish. Whether you’re installing luxury vinyl planks or standard vinyl tiles, the adhesive you pick will affect the overall performance and appearance of your floor. It’s not just about sticking things down; it’s about creating a bond that withstands daily wear and tear.
Key Takeaways
- Choose the Right Adhesive: The type of adhesive you select for vinyl flooring significantly impacts both durability and appearance. Understanding the specific needs of your project will guide you in choosing the most suitable option.
- Know Your Vinyl Type: Different adhesives are better suited to different types of vinyl flooring, such as luxury vinyl planks (LVP), vinyl tiles, and vinyl sheets. Match the adhesive type to your flooring material for the best results.
- Consider Environmental Factors: Take into account the conditions of the installation environment, such as humidity and foot traffic. Use moisture-resistant adhesives in areas like basements and bathrooms to prevent mold and mildew.
- Proper Surface Preparation: Ensure the subfloor is clean, dry, and level before applying adhesive. This foundational step is crucial for a strong, long-lasting bond.
- Follow Application Guidelines: Adhere to manufacturer instructions for adhesive application, including spread rate and curing time. Proper installation techniques ensure optimal performance and longevity of the vinyl flooring.
- Maintenance and Repair: Regularly inspect adhesive areas, especially in high-traffic zones. Promptly address any signs of wear or damage to maintain the flooring’s durability and appearance.
Understanding Glue for Vinyl Flooring
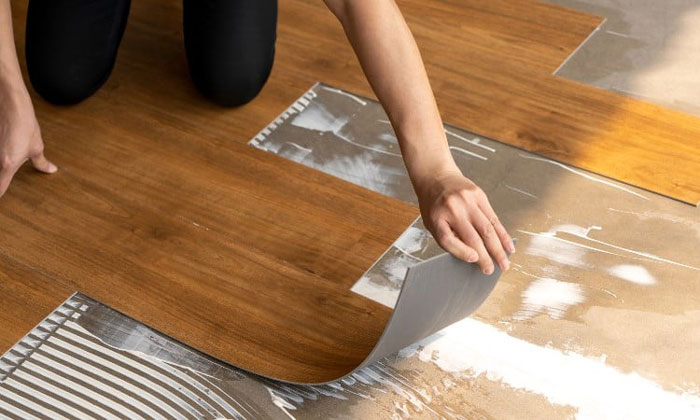
Selecting the right glue for vinyl flooring impacts both durability and appearance. Adhesives bond vinyl to subflooring, ensuring the installation endures daily wear. Understanding various glue types helps choose the best option for your project.
Types of Glue
- Pressure-Sensitive Adhesive (PSA): Used for luxury vinyl tiles and planks. Bonds on contact when pressure is applied.
- Acrylic-Based Adhesive: Ideal for areas with heavy foot traffic. Offers strong, durable bonds.
- Epoxy-Based Adhesive: Provides superior bond strength for high-moisture environments. Often used in commercial settings.
Key Factors in Selecting Glue
- Subfloor Type: Different adhesives work best on different subfloors (e.g., concrete, plywood).
- Environmental Conditions: Consider temperature and humidity. Some adhesives perform poorly in extreme conditions.
- Vinyl Flooring Type: Match the adhesive to the specific vinyl product (tiles or planks).
Application Steps
- Prepare Subfloor: Ensure it’s clean, dry, and smooth.
- Apply Adhesive: Follow manufacturer instructions for spread rate.
- Install Vinyl: Place vinyl according to adhesive’s open time.
- Roll Flooring: Use a roller to ensure proper adhesion.
Data Overview
| Adhesive Type | Best For | Pros | Cons |
|---|---|---|---|
| Pressure-Sensitive | Quick installations, residential use | Easy to use, bonds on contact | May not perform well under high moisture |
| Acrylic-Based | High-traffic areas, large installations | Strong bond, longevity | Requires precise preparation |
| Epoxy-Based | Moisture-prone environments, commercial settings | Superior strength, moisture resistance | Higher cost, complex application |
- Climate Consideration: For hot climates, use moisture-resistant adhesives.
- Manufacturer Guidance: Always refer to the glue manufacturer’s guidelines for compatibility with your vinyl flooring product.
- Maintenance: Regularly check adhesive areas, especially in high-traffic zones, to ensure there are no signs of weakening.
Proper selection and application of glue ensure the longevity and performance of your vinyl flooring. Choose wisely based on your specific needs and project parameters.
Types of Adhesive for Vinyl Flooring
Choosing the right adhesive for vinyl flooring ensures a durable and long-lasting finish. Several types cater to different vinyl flooring applications, each with unique strengths.
Pressure-Sensitive Adhesive
Pressure-sensitive adhesives remain tacky and provide a strong initial bond when you apply pressure during installation. This allows for some repositioning of the vinyl planks or tiles, ensuring precise alignment and minimizing errors.
Key Features:
- Tackiness: Remains tacky after application.
- Repositioning: Allows slight adjustments.
- Ideal For: Luxury vinyl planks (LVP), luxury vinyl tiles (LVT).
Usage Steps:
- Clean the subfloor thoroughly.
- Apply the adhesive evenly.
- Place the vinyl planks or tiles and adjust as needed.
Solvent-Based Adhesive
Solvent-based adhesives offer exceptional bonding strength and durability. They create a robust bond between the vinyl flooring and the subfloor, making them suitable for varied vinyl flooring applications.
Key Features:
- Strength: High bonding power.
- Durability: Long-lasting bond.
- Ideal For: Heavy traffic areas, commercial use.
Usage Steps:
- Ensure work area is well-ventilated.
- Spread adhesive evenly on the subfloor.
- Position vinyl flooring promptly.
Water-Based Adhesive
Water-based adhesives provide a safer and eco-friendly option without compromising quality. They emit fewer volatile organic compounds (VOCs), making them suitable for both residential and commercial settings.
Key Features:
- Eco-Friendly: Low VOC emissions.
- Ease of Cleaning: Water-soluble before curing.
- Ideal For: Residential areas, health-sensitive environments.
Usage Steps:
- Clean and dry subfloor.
- Apply adhesive with a trowel.
- Position vinyl tiles or planks immediately.
Modified Acrylic Adhesive
Modified acrylic adhesives offer a balanced combination of initial tack and strong final bond. They are versatile and can adhere to various subfloors, ensuring flexibility in installation methods.
Key Features:
- Versatility: Bonds to different subfloor types.
- Balance: Strong initial and final adhesion.
- Ideal For: Both commercial and residential applications.
Usage Steps:
- Prepare the subfloor properly.
- Evenly spread the adhesive.
- Lay vinyl flooring and press firmly for bonding.
Urethane Adhesive
Urethane adhesives boast high elasticity and strength, specifically engineered for areas prone to temperature fluctuations. They retain their integrity under stress, making them ideal for heavy-duty applications.
Key Features:
- Elasticity: Adapts to subfloor movements.
- Strength: Maintains bond under stress.
- Ideal For: High-traffic areas, environments with temperature changes.
Usage Steps:
- Clean subfloor surface.
- Apply adhesive and spread uniformly.
- Lay vinyl flooring, ensuring firm contact with subfloor.
Epoxy Adhesive
Epoxy adhesives are renowned for their unparalleled bonding strength and resistance to chemicals and moisture. They are best suited for challenging environments requiring maximum durability.
Key Features:
- Strength: Superior bonding.
- Resilience: Resistant to chemicals and moisture.
- Ideal For: Industrial settings, wet environments.
Usage Steps:
- Ensure subfloor is clear of contaminants.
- Mix epoxy components as per instructions.
- Spread adhesive and position vinyl flooring quickly.
| Adhesive Type | Key Features | Ideal For |
|---|---|---|
| Pressure-Sensitive | Tackiness, Repositioning | LVP, LVT |
| Solvent-Based | High Strength, Durability | Heavy traffic areas, commercial use |
| Water-Based | Eco-Friendly, Water-soluble before curing | Residential areas, health-sensitive environments |
| Modified Acrylic | Versatile, Balanced Adhesion | Commercial and residential applications |
| Urethane | Elasticity, Strength | High-traffic, temperature-fluctuating areas |
| Epoxy | Superior Strength, Chemical Resistance | Industrial settings, wet environments |
Choose the adhesive that best matches your specific vinyl flooring project to ensure optimal performance and durability.
Factors to Consider When Choosing Adhesive
Selecting the right adhesive for vinyl flooring ensures a durable and long-lasting installation. Various factors influence your choice of glue, impacting both the performance and appearance of your flooring.
Compatibility with Vinyl Flooring Materials
The adhesive must match the specific type of vinyl flooring material you’re using.
- Luxury Vinyl Planks (LVP): Use adhesives designed to support the thicker, more rigid structure.
- Standard Vinyl Tiles: Prefer adhesives that provide a strong bond over larger surface areas.
- Vinyl Sheet: Select adhesives that allow for extended working times, ensuring smooth, bubble-free installations.
Moisture Resistance
Adhesives must resist moisture, especially in areas exposed to humidity or potential spills.
- Basements and Bathrooms: Choose moisture-resistant adhesives, like urethane-based or epoxy adhesives, to prevent mold and mildew.
- Kitchens and Laundry Rooms: Consider water-based adhesives, which offer good moisture resistance and eco-friendly properties.
Environmental Considerations
Adhesives should align with environmental and safety standards to ensure indoor air quality and sustainability.
- Low VOC Emissions: Pick adhesives with low volatile organic compound emissions to reduce harmful fumes and improve air quality.
- Eco-Friendly Options: Opt for water-based adhesives, which are less toxic and better for the environment.
- Recyclability: Consider adhesives that allow for future removal and recycling of flooring materials.
Installation Method
The method of installation affects which adhesive is ideal for your project.
- Full Spread Installation: Covers the entire surface with adhesive, ensuring maximum adherence for high-traffic areas.
- Perimeter Bond Installation: Applies adhesive around the edges, suitable for lighter traffic and easier removal.
- Floating Installation: Uses minimal adhesive, often combined with a click-lock system, suitable for easy DIY projects.
Key Terms
Vinyl Flooring Materials: Different types of vinyl flooring such as planks, tiles, and sheets.
Moisture Resistance: The capability of an adhesive to withstand exposure to water and humidity.
Eco-Friendly Adhesive: Adhesives with low environmental impact, typically water-based and non-toxic.
VOC Emissions: Volatile Organic Compounds released into the air from various products, including adhesives.
| Adhesive Type | Best For | Pros | Cons |
|---|---|---|---|
| Pressure-Sensitive | Easy installations, precise alignment | Allows repositioning | Less strong than others |
| Solvent-Based | Heavy traffic areas | Exceptional strength | Higher VOC emissions |
| Water-Based | Health-sensitive environments | Eco-friendly, low VOC emissions | Less durable in moist areas |
| Modified Acrylic | Versatile applications | Quick setting, strong bond | Can be more challenging to remove |
| Urethane | Wet environments | Excellent moisture resistance | Longer curing time |
| Epoxy | Industrial use, basements | Superior strength and longevity | Higher cost, more complex to apply |
Attention to these factors ensures the adhesive performs well under specific conditions and enhances the longevity of your vinyl flooring.
How to Apply Vinyl Glue
Proper vinyl glue application is crucial for a durable, long-lasting finish. Knowing the steps ensures optimal performance for your vinyl flooring.
Pre-Installation Preparation
- Surface Preparation:
- Ensure the subfloor is level, clean, and debris-free.
- Use a grinder or floor sander to remove ridges and imperfections.
- For glue-down vinyl planks with rubber-like backing, proper surface prep is critical for a strong bond.
- Underlayment:
- Assess if your vinyl planks require an underlayment for added stability.
- Some vinyl planks come with in-built backing, but verify with manufacturer instructions.
- Primer (if necessary):
- Depending on the subfloor type and adhesive, a primer might be needed.
- Primers enhance the bond between vinyl flooring and the subfloor.
Application Techniques
- Adhesive Selection:
- Choose the right adhesive based on the type of vinyl flooring and subfloor.
- Options include Pressure-Sensitive Adhesive (PSA), Acrylic-Based Adhesive, and Epoxy-Based Adhesive.
- Adhesive Application:
- Follow the adhesive manufacturer’s guidelines for application rates.
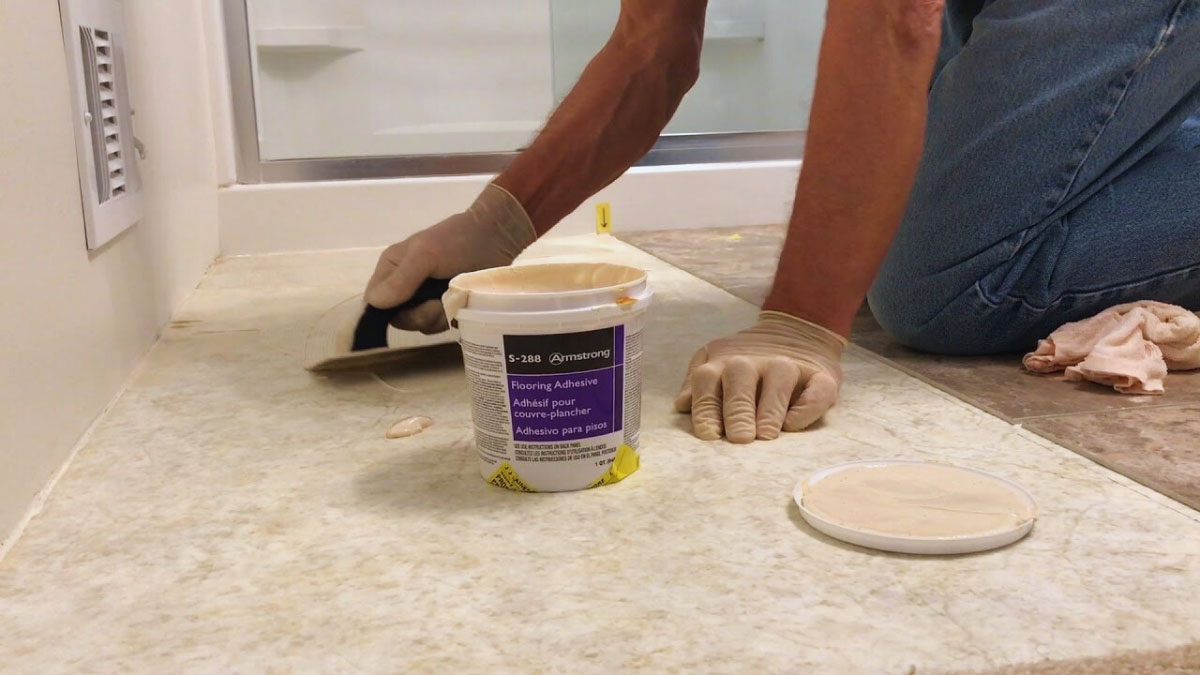
- Spread adhesive evenly using a notched trowel appropriate for the adhesive type.
- Plank Positioning:
- Lay the vinyl planks or tiles carefully, ensuring alignment.
- Press firmly to ensure good contact with the adhesive.
- Seam Treatment:
- For planks, ensure seams are tight and fit seamlessly.
- Use a seam roller to press down on seams and remove air bubbles.
Curing and Clean-Up
- Curing Time:
- Allow the adhesive to cure as recommended by the manufacturer.
- Avoid heavy traffic on the flooring until the curing process is complete.
- Clean-Up:
- Remove excess adhesive immediately with a damp cloth.
- Clean tools and workspace to prevent adhesive hardening.
| Task | Tools/Materials Needed |
|---|---|
| Surface Preparation | Grinder, Floor Sander, Vacuum, Moisture Meter |
| Underlayment | Underlayment Sheets, Manufacturer Instructions |
| Primer Application | Primer, Paint Roller, Brushes |
| Adhesive Application | Notched Trowel, Pressure-Sensitive Adhesive (PSA) |
| Plank Positioning | Vinyl Planks/Tiles, Measuring Tape, Seam Roller |
| Clean-Up | Damp Cloth, Cleaning Solvents, Waste Disposal Bags |
Ensure a smooth, efficient installation by following these steps. Proper preparation, correct adhesive application, and thorough curing and clean-up lead to a high-quality vinyl flooring finish.
Troubleshooting and Repairs
Knowing how to troubleshoot and repair your vinyl flooring ensures its longevity and appearance. Addressing tears and rips promptly prevents further damage and maintains the integrity of the flooring.
Small Tears and Rips
Small tears and rips in vinyl flooring can be mended with a few straightforward steps.
Preparation
- Clean the Area: Make sure the damaged area is clean, dry, and free of dust or debris.
- Gather Supplies: You’ll need a vinyl patch kit, adhesive, and a roller.
Repair Process
- Measure and Cut:
- Trim the damaged section to create clean edges.
- Cut a patch from the leftover vinyl, ensuring it matches the pattern.
- Apply Adhesive:
- Spread the adhesive evenly on the back of the patch.
- Position the patch so that it fits perfectly.
- Press and Seal:
- Use a roller to press down the patch firmly.
- Wipe off any excess adhesive with a damp cloth.
Large Tears and Rips
Larger tears and rips may require more extensive repair techniques to restore the vinyl flooring.
Preparation
- Assess the Damage: Determine if the tear needs a larger patch or a full plank replacement.
- Collect Necessary Tools: You’ll need a utility knife, adhesive, and a replacement plank if necessary.
- Remove the Damaged Section:
- Cut out the damaged section along the seam lines.
- Carefully lift and remove the damaged vinyl.
- Fit the Replacement:
- Cut the replacement piece to fit the gap.
- Dry fit the piece to ensure the pattern aligns.
- Adhere and Seal:
- Apply adhesive to the subfloor and the back of the replacement piece.
- Place the new piece, ensuring no gaps remain.
- Use a roller to ensure a secure bond.
By following these steps, you can effectively manage and repair tears and rips in your vinyl flooring, ensuring a long-lasting and aesthetically pleasing result.
Recommendations for a Successful Installation
Ensure a successful vinyl flooring installation using appropriate techniques and materials. To help you achieve professional results, follow these recommendations.
Key Preparation Steps
- Surface Preparation: Ensure the subfloor is clean, dry, and level. Remove any debris, wax, or old adhesive.
- Moisture Testing: Conduct moisture tests on the subfloor. Excess moisture can compromise the adhesive.
- Acclimation: Acclimate the vinyl flooring and adhesive to the room temperature for at least 48 hours.
Selecting Adhesives
Different adhesives suit various vinyl types and environments. Here are key considerations:
- Pressure-Sensitive Adhesives (PSA):
- Use: Ideal for tiles and planks. Allows repositioning.
- Environment: Suitable for controlled indoor conditions.
- Acrylic-Based Adhesives:
- Use: Good for vinyl sheet flooring. Creates a strong bond.
- Environment: Effective in moderate humidity.
- Epoxy-Based Adhesives:
- Use: Best for commercial spaces. Offers strong, durable bonds.
- Environment: Works well in heavy traffic areas.
Definition of Key Terms
- Adhesive: Substance used for sticking objects together.
- Subfloor: The foundation layer beneath the finished flooring.
- Acclimation: Process of adjusting materials to the environment.
Application Techniques
- Trowel Notch Size: Use the correct notched trowel for even adhesive distribution.
- Spreading Adhesive: Apply adhesive uniformly, avoiding gaps and puddles.
- Seam Rolling: Roll seams to ensure a tight bond and eliminate air bubbles.
- Drying Time: Follow manufacturer’s recommended drying time.
Adhesive Performance Factors
Performance can be influenced by various factors. Here’s a comparison:
| Adhesive Type | Bond Strength | Drying Time | Ideal Usage |
|---|---|---|---|
| PSA | Moderate | 15-30 mins | Residential |
| Acrylic-Based | Strong | 30-60 mins | Moderate humidity |
| Epoxy-Based | Very Strong | 60+ mins | High traffic |
Summary
By ensuring proper surface preparation, selecting the right adhesive, and applying it effectively, you’ll achieve a durable and professional vinyl flooring installation. Follow these steps closely for optimal performance and longevity.
Conclusion
Selecting the right glue for your vinyl flooring is a critical step that significantly impacts the durability and appearance of your flooring. By understanding the different types of adhesives and their specific applications, you can make an well-informed choice that suits your project’s needs. Proper preparation and application techniques are essential to ensure a high-quality finish. Regular maintenance and prompt repairs will help maintain the integrity and longevity of your vinyl flooring. Follow these guidelines closely and you’ll achieve a professional and lasting installation.
Frequently Asked Questions
Can I use contact adhesive on vinyl flooring?
Contact adhesive can be used on certain types of vinyl flooring, but it is essential to check the manufacturer’s guidelines. Ideal applications include areas that require high-temperature resistance, such as automotive and marine environments. Always consult product instructions to ensure compatibility with your specific vinyl flooring type.
How do you glue two pieces of vinyl together?
To glue two pieces of vinyl together, overlap them slightly. Apply a suitable adhesive on the overlapping area, press them together, and use a hand roller to ensure even pressure across the seam. Allow the adhesive to set as per the manufacturer’s instructions.
What do you stick vinyl flooring down with?
Vinyl flooring is typically adhered using high-quality acrylic or urethane-based adhesives. Acrylic adhesives, which are water-based, provide strong bonding and easy application. Ensure the adhesive matches the specific requirements of your flooring type and environment.
How do you glue vinyl flooring together?
When gluing vinyl flooring together, align the planks end-to-end and overlap the adhesive strips. Press firmly using a hand roller to apply even pressure over each plank. Continue this process across the room, ensuring each plank is tightly sealed along the seams.
Can vinyl flooring be glued down?
Yes, vinyl flooring can be glued down. This method is particularly beneficial in commercial spaces with heavy foot traffic, such as offices, restaurants, and retail stores, as the glue provides additional support to keep the flooring securely in place.
What types of adhesive are recommended for vinyl flooring?
Pressure-Sensitive, Acrylic-Based, and Epoxy-Based adhesives are commonly recommended for vinyl flooring. Each type has unique benefits: Pressure-Sensitive adhesives allow repositioning, Acrylic-Based are water-based and eco-friendly, and Epoxy-Based offer robust performance in heavy-duty areas.
How do environmental conditions affect vinyl flooring adhesive?
Environmental conditions such as temperature and humidity significantly influence the performance of vinyl flooring adhesive. High humidity can affect moisture resistance, while temperature fluctuations can impact the adhesive’s bond strength. Always consider environmental factors when selecting an adhesive.
What steps are involved in preparing the subfloor for vinyl flooring installation?
Preparation steps include cleaning the subfloor, ensuring it is dry and level, and conducting moisture tests. Additionally, it’s advisable to acclimate the vinyl flooring materials to room temperature before installation to ensure a smooth and durable finish.
How long does vinyl flooring adhesive take to cure?
Curing time for vinyl flooring adhesive varies by type but generally ranges from 24 to 48 hours. Follow the manufacturer’s guidelines for specific curing times to ensure optimal adhesion and performance.
How should I maintain my vinyl flooring to ensure the adhesive remains effective?
Regular maintenance checks, cleaning the floor with appropriate cleaners, and promptly addressing any damages are crucial. Avoid excessive moisture and heavy impacts to ensure the adhesive remains effective, thereby extending the life of your vinyl flooring.

