How Does Contact Cement Work: A Comprehensive Guide
Ever wondered how contact cement creates such a strong bond between materials? This versatile adhesive is a staple in woodworking, construction, and even crafting. Unlike traditional glues, contact cement forms an instant bond, making it ideal for projects where precision and strength are crucial.
When you apply contact cement, it forms a flexible, durable layer that adheres to surfaces immediately upon contact. This unique property sets it apart from other adhesives that require clamping or extended drying times. Whether you’re laminating countertops or assembling intricate models, understanding how contact cement works can elevate your DIY game to professional levels.
Key Takeaways
- Instant Bonding: Contact cement creates an immediate, strong bond upon contact, ideal for projects where repositioning materials after application is not possible.
- Versatile Applications: Widely used in woodworking, construction, and crafting, it effectively bonds materials like wood, metal, plastics, and non-porous surfaces.
- Simple Application: Requires clean, dry surfaces and can be applied using brushes, rollers, or spreaders for different types of tasks.
- High Durability: Offers excellent strength, flexibility, and resistance to heat and impact, making it suitable for high-stress applications.
- Safety Precautions: Proper ventilation, protective gear, and correct storage are essential to safely handle contact cement.
What Is Contact Cement?
Contact Cement is an adhesive known for its ability to form strong, flexible bonds. Here’s a closer look at its composition and how it works.
Definition and Composition
- Contact Cement:
- Description: A robust adhesive type designed to form immediate bonds.
- Components: Made from neoprene rubber or other rubbery polymers dissolved in a solvent.
Application Process
- Preparation:
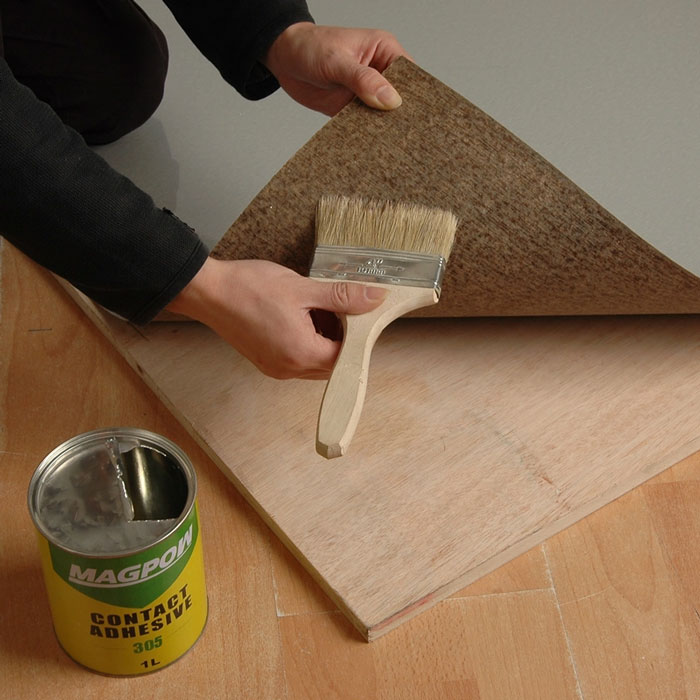
- Brush: Use a brush for small surface areas.
- Roller: Ideal for larger, flat surfaces.
- Other Applicators: Consider other tools designed for applying adhesives.
- Evaporation:
- Tacky Surface: Wait 15-20 minutes for the solvent to evaporate.
- Factors: Temperature and humidity can affect drying time.
Bonding Mechanism
- Initial Contact: Once tacky, bring both surfaces together.
- Immediate Bond: The adhesive bonds instantly, eliminating the need for clamps.
- Permanent Bond: Provides a durable and long-lasting hold.
Properties
- Strength: Offers high bond strength once set.
- Flexibility: Maintains flexibility, making it suitable for various materials.
- Durability: Resistant to heat and impact.
Uses
- Woodworking: Ideal for laminating countertops.
- Construction: Useful in bonding panels.
- Crafting: Excellent for model assembly.
| Property | Description |
|---|---|
| Strength | High bond strength, durable over time |
| Flexibility | Maintains flexibility with varying materials |
| Durability | Resistant to heat, impact, and environmental conditions |
| Application | Easily applied with brushes, rollers, or other tools |
| Bonding Time | Immediate upon contact, no need for clamps or extended set times |
Understanding contact cement’s properties boosts your DIY skills, ensuring effective and lasting projects.
How Does Contact Cement Work?
Understanding how contact cement works allows you to harness its full potential for various applications. Contact cement, known for its instant bonding properties, is crucial in projects requiring a strong, durable adhesive.
Chemical Composition
Contact cement primarily consists of:
- Neoprene Rubber: Synthetic rubber offering flexibility and high bond strength.
- Resin: Enhances adhesive properties and durability.
- Solvents: Common solvents include acetone, lacolene, and toluene, which help in dissolving the rubber and resin for easy application.
Adhesion Process
The adhesion process involves several steps to ensure maximum bond strength and effectiveness.
Application
- Surface Preparation:
- Ensure surfaces are clean, dry, and free from debris.
- Roughen non-porous or painted surfaces for better adhesion.
- Applying Adhesive:
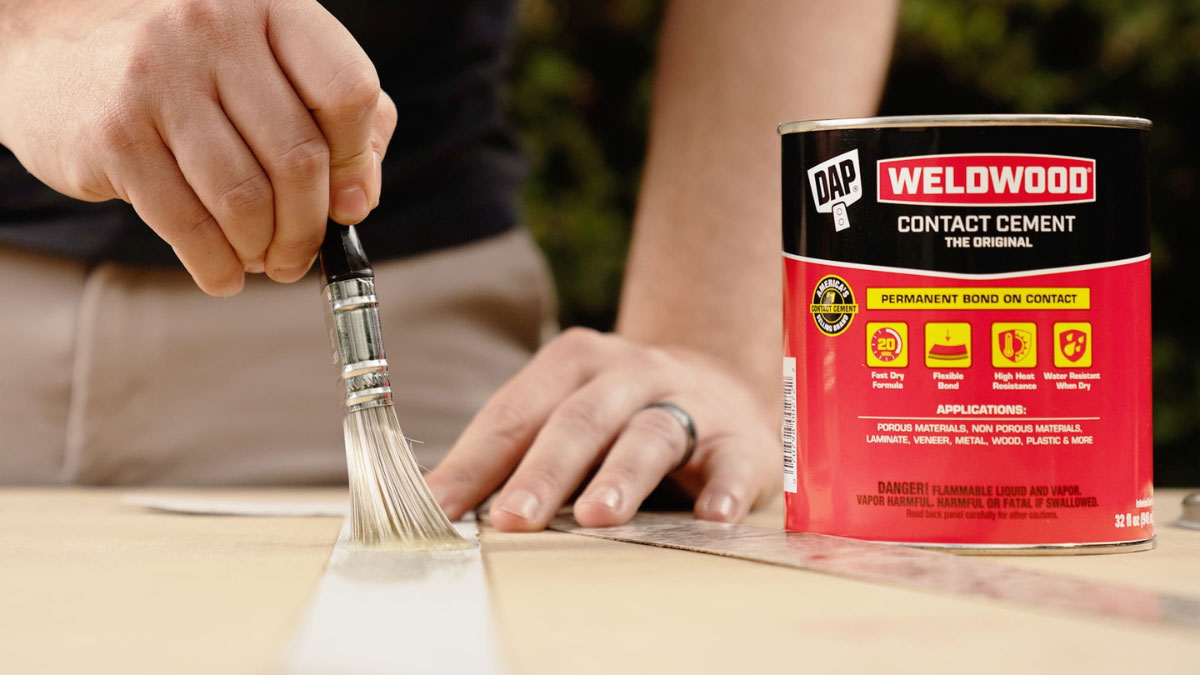
- Apply a thin, even layer of contact cement to both surfaces.
- Use a brush or roller to spread the adhesive uniformly.
Drying
- Initial Drying:
- Allow the applied adhesive to dry for 15-20 minutes.
- The surface should feel tacky and appear glossy once dried.
- Assembly Window:
- Join the surfaces within 2-3 hours of application before the adhesive loses its tackiness.
- If not joined within this time frame, apply an additional coat to reactivate the adhesive.
- Positioning Surfaces:
- Align the surfaces carefully before contact; repositioning is not possible after bonding.
- Applying Pressure:
- Press the surfaces firmly together to ensure complete contact and bond formation.
The chemical composition and detailed adhesion process of contact cement make it a valuable adhesive for various materials, enhancing its versatility in different projects.
Applications of Contact Cement
Contact cement is versatile and essential across various industries. Its unique bonding properties make it suitable for a range of uses, from DIY projects to professional applications.
Common Uses
Woodworking:
- Laminate Countertops: Contact cement is often used to bond laminate sheets to countertops. Its instant bond ensures a smooth, durable surface.
- Cabinet Assembly: It bonds veneers to wood and other surfaces, providing a strong hold without the need for clamps.
Construction:
- Flooring: Contact cement holds linoleum, vinyl, or rubber flooring materials securely. It’s ideal for areas requiring durable and flexible bonds.
- Metal Work: In metal fabrication, it bonds sheet metal parts, ensuring strong joints in products like HVAC systems.
Crafting:
- Model Construction: Use contact cement for assembling plastic, wood, or metal models. Its immediate bond reduces assembly time and increases precision.
- Leatherworking: Bond leather pieces in crafting projects like handbags, belts, or shoes, ensuring durability.
Materials It Bonds Well
Wood:
- Pine: Common in furniture making, contact cement provides a strong bond.
- Plywood: Ideal for veneering and paneling.
Metal:
- Aluminum: Frequently used in HVAC and construction, it bonds well with contact cement.
- Steel: Essential in fabrication, contact cement ensures robust adhesion.
Plastics:
- PVC: Common in plumbing and construction, it forms a solid bond with contact cement.
- Acrylic: Used in displays and signs, it bonds securely.
Non-porous Surfaces:
- Glass: For crafting and industrial applications, contact cement provides a strong hold.
- Ceramics: Suitable for tiling and pottery repair.
Key Properties and Methods
Key Properties:
- Fast Setting: Offers quick adhesion upon contact.
- Durability: Maintains a strong bond over time.
- Flexibility: Adapts to slight movements and expansions.
Methods:
- Surface Preparation: Ensure surfaces are clean and free of debris to enhance adhesion.
- Application Technique: Apply an even, thin layer on both surfaces using a brush or roller.
- Bonding Process: Wait for the solvent to evaporate (typically 15-20 minutes), then press the surfaces together firmly.
| Industry | Application | Materials |
|---|---|---|
| Woodworking | Laminate Countertops, Cabinet Assembly | Wood, Plywood |
| Construction | Flooring, Metal Work | Linoleum, Vinyl, Metal |
| Crafting | Model Construction, Leatherworking | Plastic, Leather, Fabric |
| Material | Properties |
|---|---|
| Wood | Strong bond, durable with veneers |
| Metal | Secure adhesion with aluminum and steel |
| Plastics | Reliable with PVC and acrylic |
| Non-porous | Effective on glass and ceramics |
Understanding contact cement’s applications can enhance your projects by ensuring the right materials and techniques for durable, reliable bonds.
How to Apply Contact Cement
Applying contact cement correctly ensures a strong, durable bond. Follow these steps to achieve optimal results.
Surface Preparation
- Cleanliness: Ensure both surfaces are clean, dry, and free of all foreign materials. Dust, dirt, grease, or old adhesives can affect the bonding quality.
- Temperature: The temperature of the adhesive, the surfaces being bonded, and the working area should be at or above 65°F (18°C). Lower temperatures can hinder adhesion.
- Surface Preparation for Non-Porous Surfaces: Roughen painted or non-porous surfaces before applying the adhesive. This step improves the bond strength by allowing the adhesive to grip the surface better.
Application Steps
- Stirring: Stir the contact cement thoroughly with a standard paint paddle or stirring stick to ensure even consistency.
- Application: Use a paint brush, short nap roller, or finishing trowel to apply an even coat of adhesive to both surfaces.
- Drying Time: Allow the adhesive to dry for 15-20 minutes. The surface should feel tacky but not transfer adhesive when touched lightly.
Two-Coat Method
For porous surfaces or stronger bonds, use the two-coat method:
- First Coat: Apply the first coat of contact cement to both surfaces and allow it to dry completely. This initial layer seals the porous material.
- Second Coat: Apply a second coat and let it dry for 15-20 minutes. This ensures that the adhesive forms a strong bond.
Joining the Pieces
- Positioning: Carefully align the surfaces before making contact. Contact cement bonds instantly, so repositioning isn’t possible.
- Bonding: Press the surfaces together firmly, applying uniform pressure to ensure a strong bond.
- Curing: Let the bonded pieces cure for at least 24 hours before subjecting them to stress.
| Step | Description |
|---|---|
| Cleanliness | Ensure surfaces are clean and free of foreign materials |
| Temperature | Maintain adhesive and surface temperature at or above 65°F (18°C) |
| Surface Roughening | Roughen non-porous surfaces |
| Stirring | Stir the adhesive thoroughly |
| Application | Apply evenly to both surfaces |
| Drying Time | Allow 15-20 minutes for adhesive to become tacky |
| Two-Coat Method | Apply two coats for porous surfaces |
| Positioning | Align surfaces before bonding |
| Bonding | Press surfaces together firmly |
| Curing | Let bond cure for 24 hours |
Following these steps ensures a reliable, strong, and long-lasting bond with contact cement.
Safety Precautions
General Safety
Using contact cement requires attention to safety to ensure a secure and healthy working environment.
Ventilation: Proper ventilation is crucial when working with contact cement. The adhesive emits vapors that are not only strong-smelling but also flammable and potentially harmful to your health. Always work in a well-ventilated area, preferably outdoors or in a space with good airflow, to minimize inhalation risks.
Temperature: Temperature affects the drying process and bond strength of contact cement. Ensure the working area, adhesive, and surfaces are at or above 65°F (18°C). This temperature range facilitates proper evaporation of the solvent and optimal bonding conditions.
Protective Gear: Wearing appropriate protective gear is paramount. Use gloves to protect your skin from direct contact with the cement. Goggles or safety glasses prevent accidental splashes from reaching your eyes. If ventilation is poor, wearing a respirator can further reduce inhalation risks.
Handling And Storage
Contact cement contains solvents that can pose risks if not handled and stored correctly.
Storage: Store contact cement in a cool, dry place away from direct sunlight and heat sources. Ensure the container is tightly sealed to prevent solvent evaporation and maintain adhesive quality.
Handling: When handling large quantities, use spill containment measures to prevent environmental contamination. Clean any spills immediately using an appropriate solvent and dispose of waste materials following local regulations.
Fire Safety: Due to the flammable nature of contact cement vapors, keep it away from open flames, sparks, and other ignition sources. Have a fire extinguisher rated for chemical fires nearby as a precaution.
Emergency Measures
Knowing what to do in case of an emergency can mitigate risks associated with contact cement use.
Skin Contact: If contact cement comes into contact with your skin, wash the affected area with soap and water promptly. Seek medical advice if irritation persists.
Eye Contact: In case of eye contact, flush your eyes with water for at least 15 minutes and seek immediate medical attention.
Inhalation: Move to fresh air immediately if you experience dizziness, headache, or difficulty breathing due to vapor inhalation. Seek medical help if symptoms do not subside.
Work Environment Setup
Setting up your workspace effectively can enhance safety while using contact cement.
Workspace Organization: Keep your workspace organized to avoid accidents. Ensure tools, adhesive, and materials are within easy reach but do not clutter your working area.
Surface Protection: Use protective coverings like drop cloths or plastic sheeting to guard surfaces from adhesive spills, making cleanup easier and preventing unwanted bonding.
Clean Tools: Regularly clean tools and equipment used with contact cement to maintain their functionality and prolong their lifespan. Use appropriate solvents for cleanup and store tools properly after use.
| Safety Item | Purpose | Usage Tips |
|---|---|---|
| Gloves | Protects skin from adhesive contact | Use disposable nitrile or latex gloves for easy cleanup. |
| Goggles/Safety Glasses | Protects eyes from splashes | Ensure a snug fit to prevent gaps. |
| Respirator Mask | Reduces inhalation of harmful vapors | Use in poorly ventilated areas or for extended exposure. |
| Fire Extinguisher | Addresses fire hazards from flammable vapors | Keep a chemical-rated fire extinguisher within easy reach. |
| Spill Containment Kit | Manages accidental adhesive spills | Include absorbent materials and appropriate solvents for cleanup. |
Safety precautions are critical when working with contact cement. Following these guidelines, wearing appropriate protective gear, and maintaining a well-organized workspace ensures a safer and more efficient experience with this effective adhesive.
Choosing the Right Tools
Selecting the correct tools for applying contact cement is crucial to get a strong and lasting bond. Here’s a guide to help you choose the right tools based on the task at hand.
Tools and Their Uses
Brushes
- Natural-Bristle Brushes: Suitable for applying contact cement on wood and other porous surfaces. They provide a smooth, even coat and are durable.
- Foam Brushes: Ideal for applying contact cement on smooth surfaces like metal or glass. They minimize streaks and help control the amount of adhesive applied.
Rollers
- Rubber Rollers: Commonly used for large surfaces such as countertops. They ensure a consistent application and can cover broad areas efficiently.
- Foam Rollers: Best for uneven or textured surfaces. They adapt well to the contours, providing an even application.
Spreaders
- Plastic Spreaders: Great for small or detailed work. They allow precise application and help in controlling the adhesive thickness.
- Metal Spreaders: Used for heavy-duty projects. They offer durability and are reusable after proper cleaning.
Application Steps
- Surface Preparation
- Clean your surfaces thoroughly to ensure they are free of dust, grease, and other contaminants.
- Roughen non-porous surfaces with sandpaper for better adhesion.
- Choosing the Right Brush or Roller
- Select a natural-bristle brush for wood or porous surfaces.
- Use a foam brush or roller for smooth, non-porous surfaces.
- Applying Contact Cement
- Apply a thin, even coat of contact cement to both surfaces using your chosen tool.
- Let the solvent evaporate completely for 15 to 20 minutes until the surfaces are touch-dry but still tacky.
- Joining Surfaces
- Carefully align the pieces as contact cement forms an instant bond.
- Apply uniform pressure using a roller to eliminate air bubbles and ensure full contact.
| Tool Type | Best For | Examples |
|---|---|---|
| Natural-Bristle Brush | Wood, porous surfaces | Wooden boards, plywood |
| Foam Brush | Smooth surfaces | Metal sheets, glass panels |
| Rubber Roller | Large surfaces | Countertops, tables |
| Foam Roller | Textured surfaces | Decorative surfaces |
| Plastic Spreader | Small, detailed work | Model assembly, small crafts |
| Metal Spreader | Heavy-duty projects | Flooring, large panels |
Choose the right tools to ensure the effectiveness of contact cement, improving bond quality, and saving time on your projects.
Conclusion
Mastering the use of contact cement can elevate your DIY projects to a professional level. By understanding its unique properties and application techniques, you can achieve strong, durable bonds across a variety of materials. Proper surface preparation and the right tools are key to maximizing its effectiveness.
Safety is paramount when working with contact cement. Ensuring good ventilation and using protective gear can help you avoid potential hazards. By following these guidelines, you can confidently tackle projects ranging from woodworking to crafting with exceptional results.
Frequently Asked Questions
What is contact cement used for?
Contact cement is used for bonding a variety of materials, such as wood, metal, plastics, and non-porous surfaces like glass and ceramics. It’s commonly utilized in woodworking, construction, and crafting projects, including laminating countertops, assembling models, and securing flooring materials.
How does contact cement work?
Contact cement creates an instant bond upon contact, forming a durable and flexible adhesive layer. After applying it to both surfaces, you allow the solvent to evaporate for 15-20 minutes, then press the pieces together for an immediate and permanent bond.
What materials bond well with contact cement?
Contact cement works well with materials such as wood, metal, plastics, glass, ceramics, and other non-porous surfaces. Its versatility makes it suitable for numerous applications across various industries.
How should I apply contact cement?
Apply contact cement with a brush or roller, ensuring a thin, even coat. Allow the solvent to evaporate for 15-20 minutes before pressing the surfaces together. For porous surfaces, consider applying a second coat to enhance bond strength.
What safety precautions should I take when using contact cement?
Ensure proper ventilation due to flammable and potentially harmful vapors. Use protective gear such as gloves and goggles, and maintain a working temperature above 65°F (18°C). Keep your workspace organized to prevent accidents and follow emergency measures for skin, eye contact, and inhalation.
How long does contact cement take to set?
Contact cement sets almost immediately upon joining the surfaces, but allow the bonded pieces to cure for at least 24 hours before subjecting them to stress to ensure maximum bond strength.
How do I store contact cement safely?
Store contact cement in a cool, dry place away from sources of heat or open flames. Ensure the container is tightly sealed to prevent exposure to air, which can cause the adhesive to harden over time.

